Creating Levels with REPOLib SDK
NOTICE
This page is currently Work in Progress!
NOTE
This guide assumes you have a REPOLib Unity project set up for REPOLib modding.
If not, follow Getting Started first.
- The patcher outputs vanilla levels to
Assets/REPO/Game/ScriptableObjects/Leveland their assets toAssets/REPO/Game/Resources/level. - On the
Levelasset, make sure that theValuable Presetslist is empty.- This will make generic valuables spawn in your level. If you'd like specific valuables to also spawn, see Proxy Valuable Presets.
Creating a Level object
- Right click in your mod folder and choose
Create > Level > Level Presetto create aLevelobject. The default name for this will beLevel - _____. Replace the underscores in theLevelobject with yourResourcename. - Fill in the fields:
Resource Path: A unique name for your level that you'll name all your files after.Narrative Name: The actual name that will show up in game and to the players in the loading screen.
For this example level, we'll be using:Resource Path: ExampleNarrative Name: Example Level
Loading Graphics 01: The building sprite that the truck crashes in to on the level loading screen.Loading Graphics 02: The background sprite for terrain like trees/mountains.Loading Graphics 03: The far background sprite for further terrain and the horizon/moon/sun.Valuable Presets: The valuables you want to appear in your level, see Proxy Valuable Presets.Music Preset: The "music" that can play randomly during the level. For now, let's use a placeholder vanilla one.Level Music - Arctic (Level Music).Ambience Presets: The ambient noises that play randomly during the level. For now, let's use a placeholder vanilla one.Level Ambience - Global (Level Ambience).
Creating a Level Content object
- Right click in your mod folder and choose
Create > REPOLib > Levelto create aLevel Contentasset. Rename this to yourNarrative Name. - Fill in the fields:
Level: Drag yourLevelasset into this entry. (Level - Example)Connect Object: The door prefab that always spawns between connected modules (optional).Block Object: The prefab that always spawns between unconnected modules (optional).
Modules
- There are 5 types of Modules (rooms):
Start Room: Module containing the truck that the players spawn in and the first extraction. These do not have a difficulty level and always spawn exactly 1.Normal: Most common module that contains Module Prop Switches, and can connect to adjacent modules on all 4 sides. Has 3 difficulty levels.Passage: Always has two entrances on opposite sides. Has 3 difficulty levels.Dead End: Rarest module that has a chance to spawn connected to any of the other above modules. Has 3 difficulty levels.Extraction: Required modules that contain the extraction points. Has 3 difficulty levels.
- Module Size:
The maximum size a vanilla module can be is 3x3 (15x15 units/meters), with the coordinates spanning
-7.5to7.5in both the X and Z axes.Anything extending past the module bounds will have a chance to overlap with neighboring modules, except for
Start Roomsthat can expand as far back as you'd like.Using this, we know the doorways will always spawn at these coordinates:
Normal Modules X Y Z Top 0 0 7.5 Right 7.5 0 0 Bottom 0 x -7.5 Left -7.5 0 0 Module Type X Y Z Starter Room 0 0 0 Dead End 0 0 -7.5 Extraction 0 x -7.5 Passage TOP 0 0 7.5 Passage BOT 0 0 -7.5
Module Prop Switches
Module Prop Switches are only used in
Normalmodules and are required. These are what are used to change how a room looks depending on if that side is connected to another module or not.Typically, we have 4 parents for each side of a module. Each parent should have the
Module Prop Switchcomponent where you can drag in yourConnectedandNot Connectedparents respectively, and set the connection side.
Level Path Points
Level Pointsneed to be on the navmesh and are used by enemies as wander points and general navigation.Level Pointsshould not be in extraction modules.- Connected path points need to be correctly connected and referenced to one another on both objects. For example, if
TOPhas a connected pointMiddle. TheMiddlepath point should also have a connected point toTOP. - To assign path points, click and drag the desired point in to the
Connected Pointsfield on aLevel Pointobject. - There are two kinds of
Level Pointswhich are used for enemy navigation. A straight line is drawn between all connected path points, and there should be no objects obstructing that path.External: These are marked asModule Connectobjects and are required on every module type, except for Extraction Modules. External path points should NOT be connected to each other, only toInternalpath points. External path points should be placed near/on these coordinates:External Path Points X Y Z Top 0 0 5 Right 5 0 0 Bottom 0 0 -5 Left -5 0 0 Internal: These are optional path points that are not marked asModule Connectobjects and are used for adding extra navigation within a module, like going around a corner or up/downstairs.
DirtFinder
DirtFinderis the object used to display the in-game minimap. There are 3 categories of meshes we use for maps:Floor: The dark green shapes that display the floor.Wall: The lighter green lines that outline the walls.Door: The white lines that are attached to doors.
Each
DirtFindermesh type has a subset of different shapes to properly display your physical level to the minimap.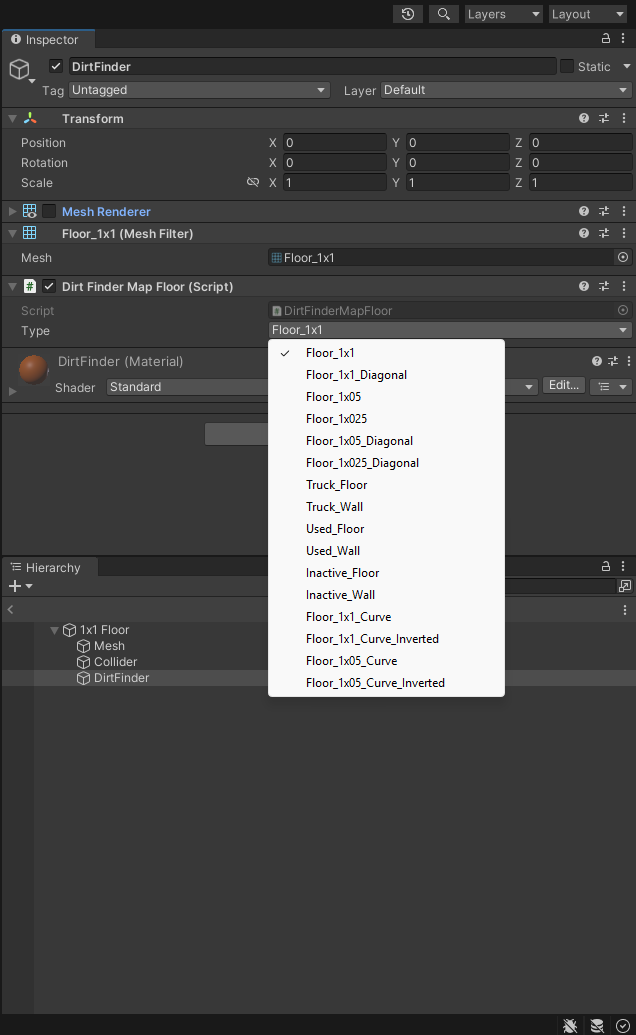
You can get a better visual aid by assigning your
DirtFinderobject with aMesh FilterandMesh Rendererwith the appropriate mesh. Make sure to disable this afterwards, or else it will appear in-game.
Navmesh
The
Navmeshis used by Enemies to pathfind between modules.In the Editor, the
NavMeshwill show up as a blue highlight displaying where enemies are able to navigate.NavMeshModifiersare typically assigned to the parent of your floors/walls which applies the modification to all the colliders in the children.NavMeshModifiershave 3 different area types:Walkable: Allows navigation on all nested colliders.Not Walkable: Overwrites collider navigation and removes walkability.Jump: Forces enemies to pathfind by jumping over selected colliders.
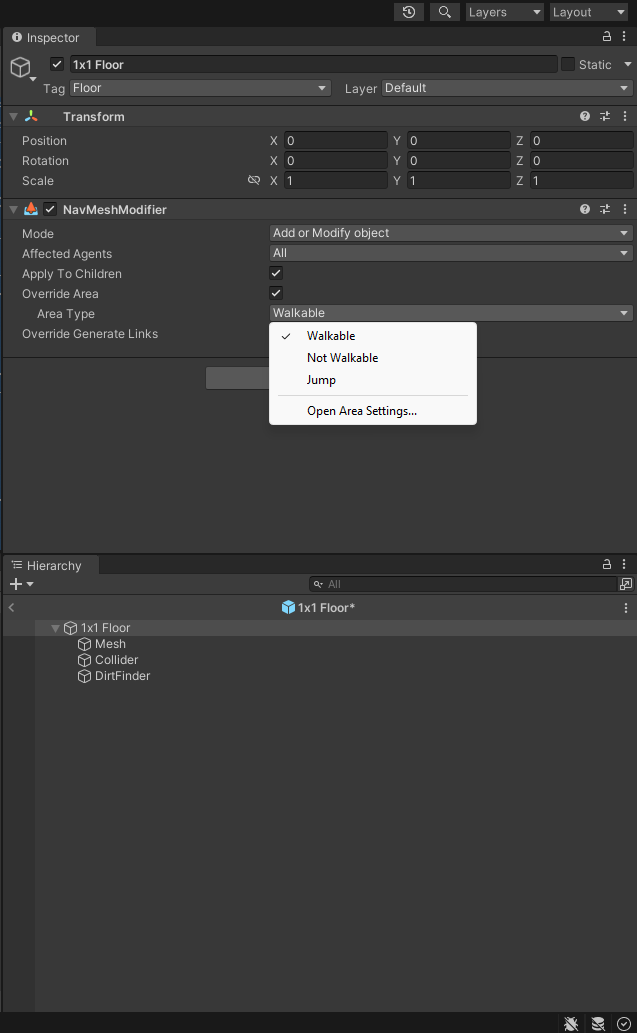
Typically, we want to assign
Walkableto all our floors, andNot Walkableto all our walls and any props (like tables, decorations, etc.).
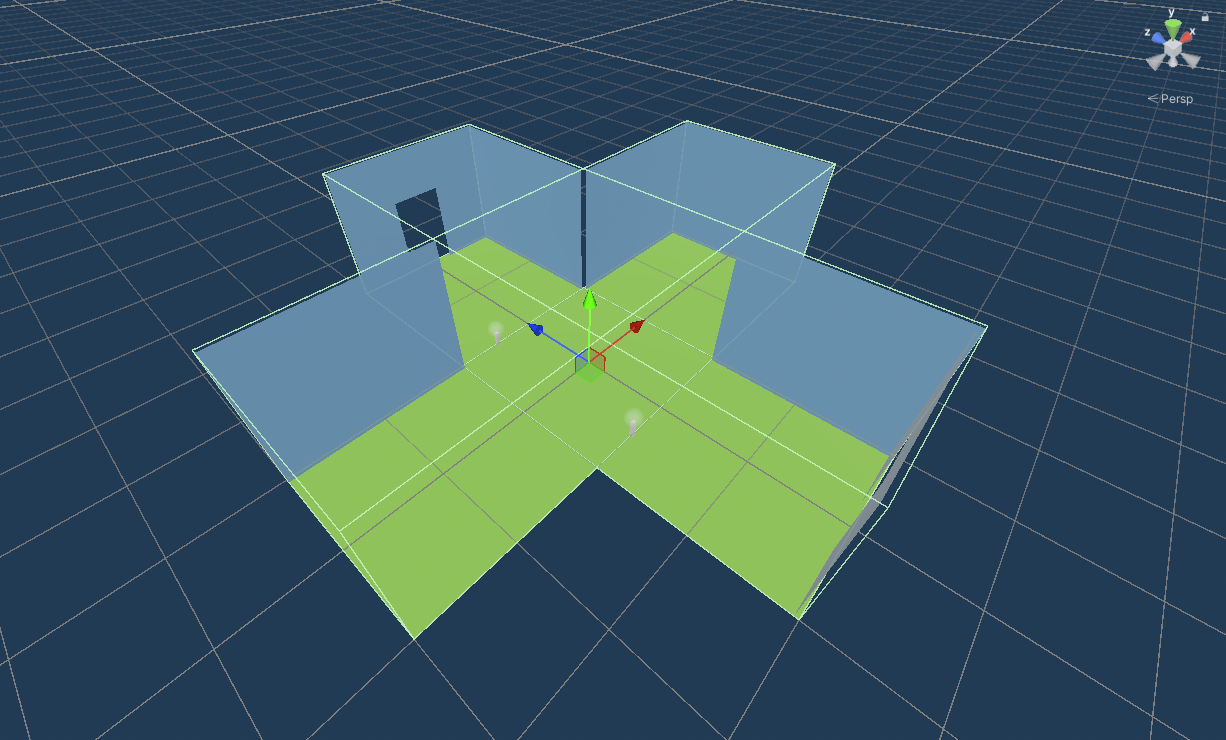
Room Volume
Room Volumesare used for ambient sound logic, as well as displaying the undiscovered rooms on the minimap.Room Volumeobjects should include aBox Colliderand theRoomVolumescript, and must be assigned to theRoomVolumelayer at the top of the Inspector.Room Volumescan overlap each other and should cover the entire walkable area, but should not extend outside of the module boundaries.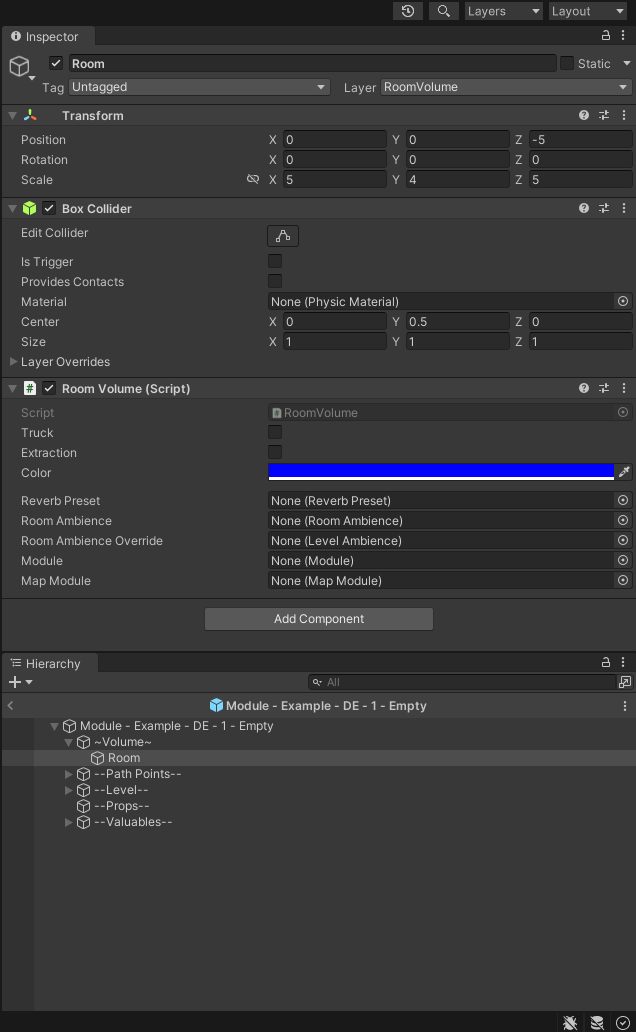
Doors
Doors are optional prefabs we can use to connect between modules.
They should be centered on
0, 0in their prefab.For our example, we can copy the
Manor Doorprefab and reference it to make our own doors.To make sure our door fits in our doorways, we want to make sure the
PhysGrabObjectCollideris slightly smaller around the edges than the actual door mesh.Make sure the collider also has the
Phys Grab Objecttag and is under thePhysGrabObjectHingelayer. Our collider should also have thePhysGrabObjectmaterial assigned.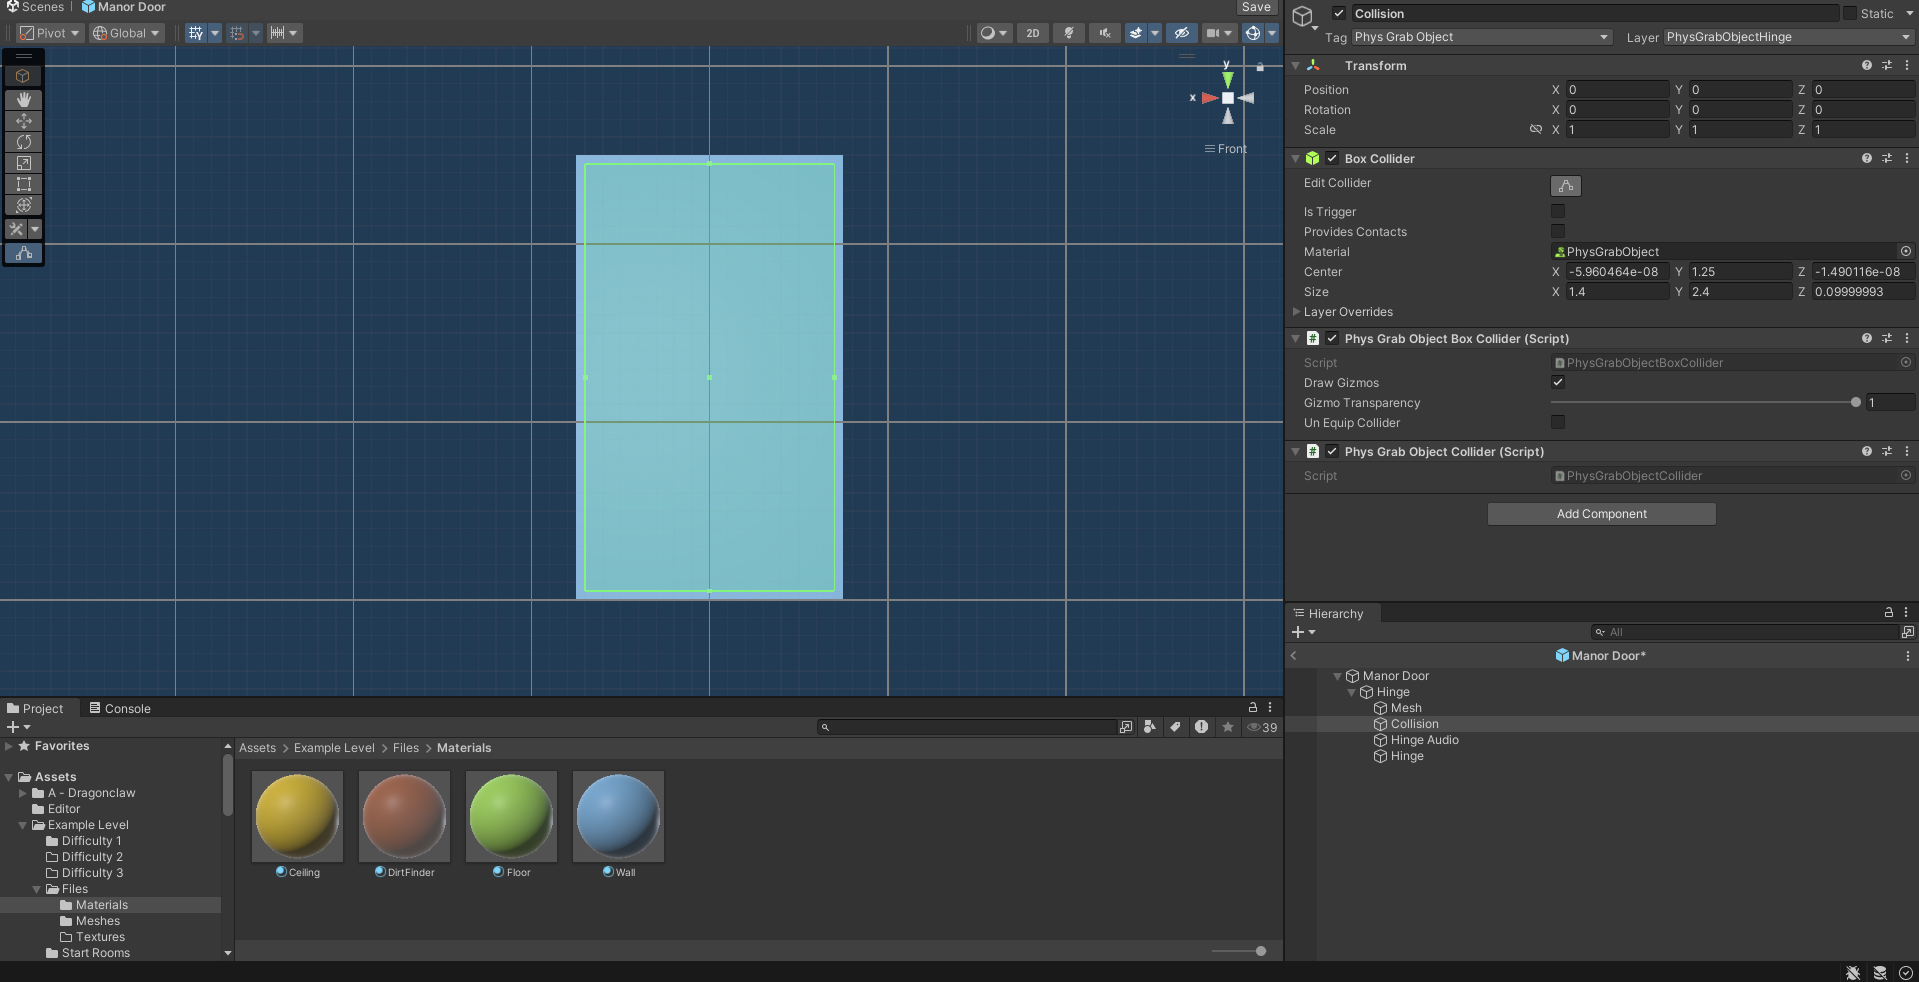
Proxy Valuable Presets
To use vanilla Level Valuables presets in your levels, you should not simply reference them in the Level asset. This is because the bundle will then contain duplicates of all the vanilla valuables from that preset. Instead, you have to create a "proxy" preset:
- Create a
Level Valuablesasset anywhere in your project by right-clicking and choosingCreate > Level > Level Valuable Preset. - Name the asset exactly as the vanilla one you want to include (see Creating Valuables with REPOLib SDK).
- Add your newly created preset to
Level Valuablesin yourLevelasset.
At runtime, REPOLib will match the name and replace your proxy with the real preset.