Getting Started with REPOLib SDK
NOTE
This page assumes you have a Unity project setup for R.E.P.O. modding.
If not, first follow the guide in Unity Project Setup.
Adding REPOLib to the Project
Navigate to the Unity menu bar and click
Window > Package Manager.Click the
+button in the top left of the Package Manager and chooseAdd package from git URL...: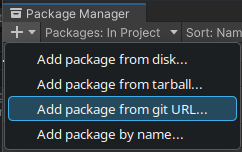
Paste the following Unity Package link into this text field:

- REPOLib SDK: Editor tools that streamline REPOLib content creation and export.
bashhttps://github.com/ZehsTeam/REPOLib-Sdk.gitTIP
To update REPOLib SDK, open the Package Manager, select the
REPOLib-Sdkpackage in the list, and clickUpdate.After REPOLib SDK finishes installing, you need to add the missing REPOLib
.dllto your project in the following steps.Download REPOLib from Thunderstore.
Extract the downloaded archive.
Copy or drag-and-drop the
REPOLib.dllfile into any location within your project'sAssetsfolder:
To verify the installation, right-click inside the Project window. You should see a new sub-menu option:
Create > REPOLib:
WARNING
If you have errors for missing references to Assembly-CSharp-firstpass.dll, select
REPOLib.dllin the project window, then uncheckValidate Referencesin the Inspector: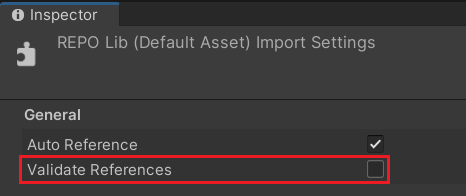
TIP
To update REPOLib in the future, simply replace the existing
.dllfile with the newer version.
Working with Mods and Content
Content in REPOLib is organized with Mod and Content assets. Each Mod has its own folder with its content.
Here's an example file hierarchy:
- 📁
Assets- 📁
MyModFolder- 📄
MyMod.asset - 📄
MyValuable.asset(Content asset, references the prefab) - 📦
MyValuablePrefab.prefab - 📁
EnemyFolder- 📄
MyEnemy.asset(Content in subfolders is also fine)
- 📄
- 📄
- 📦
MyEnemyPrefab.prefab(Other assets can be outside of the mod's folder) - 📁
MyOtherModFolder- 📄
MyOtherMod.asset
...
- 📄
- 📁
Mods can be exported directly from the Editor, where REPOLib SDK automatically handles bundling the assets and packaging the files for Thunderstore (see Export a Mod).
Create a new Mod
Create a new folder in your project.
Right click in the folder, then choose
Create > REPOLib > Mod.Complete the fields in the
Modasset:Name: The mod's name, as shown on Thunderstore. This can only contain numbers, letters and underscores.Author: The name of your Thunderstore team.Version: Must be in the formatX.Y.Z, in accordance with Semantic Versioning.Description: A short description of your mod. Must not exceed 250 characters.Website Url: Optional. This can link to your mod's source (like GitHub), a Discord channel for discussion/issues, etc.Dependencies: A list of dependency strings.Zehs-REPOLib-X.Y.Zshould always be included (whereX.Y.Zis the target version).Icon: Must be a 256x256 PNG file.Readme: A longer description of the mod in a separate Markdown (.md) file, which will be displayed on your mod's main page. You can use Thunderstore's Markdown Preview tool.Extra Files: Additional files to include in the package, for example a DLL containing your scripts or aCHANGELOG.mdfile.Extra Bundle Files: Additional assets to be included in the mod's.repobundle.
TIP
You can have multiple mods in the same project, as long as they are in separate folders.
Export a Mod
Select the
Modasset and clickExportin the inspector.- In the window you'll see the associated content files found by REPOLib-Sdk.
Choose an
Output Path. The path is relative to the Unity project (unless you specify an absolute path).Click
Exportand wait. Once finished, a window should appear showing the exported ZIP file. This file can be uploaded to Thunderstore or locally imported into mod managers.WARNING
REPOLib SDK creates multiple folders and files under the export path. Therefore, it is recommended to use a new, empty folder as the target.
TIP
The export window can also be accessed from
Window > REPOLib Exporter